If you look at my recent posts, the pattern that I think emerges is that I’m learning that technologies and disciplines that previously seemed inaccessible, are in fact most definitely accessible. For instance, I assumed that since FPGAs aren’t something you see very often, using them must be a magical process with a high barrier to entry, requiring lengthy instruction from people who already know what they’re doing. Instead, as long as you’re willing to invest about $200 and a bunch of time, the tools are free and getting basic things working is straightforward. Similarly for microcontrollers: even without platforms like the Arduino to bring the barrier down even lower, getting a basic microcontroller breadboard working is just a matter of reading a schematic and following instructions.
This is a post about another area that I thought was off-limits to mere mortals: custom PCB design and production. In middle school I got to etch my own circuit board, but the end result was a trivial “who pressed the button first” board. That experience was definitely cool, but I think it might have left me with an even greater perception of the inaccessibility of PCB fabrication.
Low-cost PCB options
But then someone pointed me to OSH Park, a “community printed circuit board” site. Similar to Multi-Wafer Fabrication, a low cost ASIC production method that I talked about in a previous post, this sort of panelized pcb construction aims to reduce fixed costs for small PCB orders by batching a number of them into a larger order, which is then submitted to a PCB fab house for actual production. I don’t know how much a dedicated PCB run costs, but OSH Park’s pricing structure certainly goes way lower: you pay $5 per square inch, and get three copies of your board. I tested their site and they don’t have a minimum size; I submitted a tiny board and got a quote back for a total cost of $1.85, including shipping! This is in contrast to other “low cost” pcb places that charge hundreds of dollars minimum for any order, though the unit price after the upfront cost is way lower. I decided to check out a bunch of other sites as well; I was looking for 2-layer options (most of these places offer 4-layer as well at increased cost), and my main criteria were price and turnaround time. Here are the most promising options I found:
- OSH Park is one name that kept on coming up in recommendations, so often that I now use it as the benchmark against which to compare other sites. (Many people recommend Batch PCB, which was acquired by OSH Park, and I assume that the recommendations transfer.) As I mentioned, they have a flat $5/in^2 pricing model for a 2-layer board, and have special “medium run” pricing if your board is 150in^2 or more (I’m not sure if this also applies if you submit multiple orders totaling more than 150in^2). As for speed, I submitted a design on 7/30, paid $5 for Priority Mail shipping, and received the boards today, 8/9.
- ExpressPCB seems to be the best “fast” option: as opposed to the 7 business-day turnaround (time from design-submission to shipped to me) I got from OSH Park, ExpressPCB advertises as low as a 1-day turn. There are other places that even offer same-day turnarounds, but ExpressPCB was unique in the price point they offered: their lowest offering is $51+shipping, when I couldn’t find another place that offered 1-day turns for any less than $500! There are a number of constraints on this particular offering though, such as not getting any soldermask or silkscreen layers, and also only being offered at a 3.8″x2.5″ size. That said, these seem like overcome-able obstacles if I want a board fast. They also offer more traditional offerings, such as $166+shipping for a 2-day turn on anything less than 21in^2, which is quite competitive with OSH Park if you use the full size: you pay 75% more to get it 2-3x faster.
- Gold Phoenix: I can’t quite reverse-engineer their pricing function, but it seems to be $1 per square inch, with a $100 minimum. In contrast to OSH Park and ExpressPCB, where you get a fixed 3 or 4 copies of your board for the price they quote you, the Gold Phoenix $1/in^2 price is per board, with no minimum number of boards (except for the $100 minimum). This could be great for me, since I typically just want a single copy of a board I’m working on, and have to pay for the additional copies from OSH Park regardless. For instance, buying a single copy of a 100in^2 board would cost $100 at Gold Phoenix, and getting it made at OSH Park would cost $500, though you’d get three copies. Realistically, you’d probably want to get multiple copies of your board, especially since I’ve seen some reports that Gold Phoenix can sometimes mess up boards (though that seems to be the case with any of these low-cost options), but even if you compare getting two 50in^2 boards from Gold Phoenix for $100 vs getting 3 of them from OSH park for $250, it seems like a good deal. The $100 minimum is pretty low compared to more traditional PCB houses, but it’s still way higher than the $0 minimum at OSH Park, so I’m not sure when I’ll try them.
I haven’t tried ExpressPCB or Gold Phoenix so I can’t actually evaluate them, but based on their features and pricing, and with some basic due diligence google searching, these three places seem like the best options, at least at face value. OSH Park seems like a good all-around place, with bonus points for having a very good reputation; ExpressPCB seems like a good choice if you’re willing to pay for faster turnaround, and Gold Phoenix seems like something interesting to try if your order would be more than $100 on OSH Park.
There are a bunch of other pcb manufacturers as well; one of the most common types is what I affectionately call the “cheapo chinese” options, since I’ve found a multitude of chinese sites that offer the same suspiciously-cheap service: 10 5x5cm (roughly 4in^2) boards for $9.90. I’m actually very curious how it works behind the scenes, since there are so many places that offer that exact service at that exact price point. The price seems very good, and gets even better if you look into their larger offerings, such as this site that offers 10 20x20cm (~62in^2) boards for $85. I’m not sure what the catch is, but the price is low enough to justify trying out, so I submitted an order to what seemed like one of the most reputable of these services, SeeedStudio Fusion. Shipping starts at $5.30 for their “0-30 day” shipping option, but they offer a bunch of other cheap electronics components, and you can bundle them into a single order to amortize the shipping cost.
PCB Design and Fabrication
After I had done my research and learned about the PCB manufacturing options, the inevitable next step is to design my own board and have it made. I searched around for something I wanted to make into a board, and I settled on my edge detector circuit. My thinking is that it’d be nice to have a simple logic analyzer that I can use to debug interfaces between components, and I decided to build a simple “activity monitor” (not calling it a logic analyzer since it’s nowhere near that level) that shows both the logic level and edge detection for a couple separate signals. I decided to make it follow the PMOD pin interface, so that I can connect it directly to the pmod ports on my Nexys 3.
The first step is to design a schematic for what I want to build; I decided to do this in Eagle since it seems to be the most talked-about option. In retrospect, this process was fairly simple, except for the fact that I had to learn Eagle. SparkFun was a tremendously helpful source: this tutorial walks you through creating a simple Eagle schematic, but maybe more importantly links to their Eagle parts library, which contains a huge number of parts in it, and was especially helpful since I’ve been ordering from them.
The schematic ended up being pretty simple: I decided to use the hex inverter I got, but otherwise the schematic is the same as the single-signal version from my earlier post:
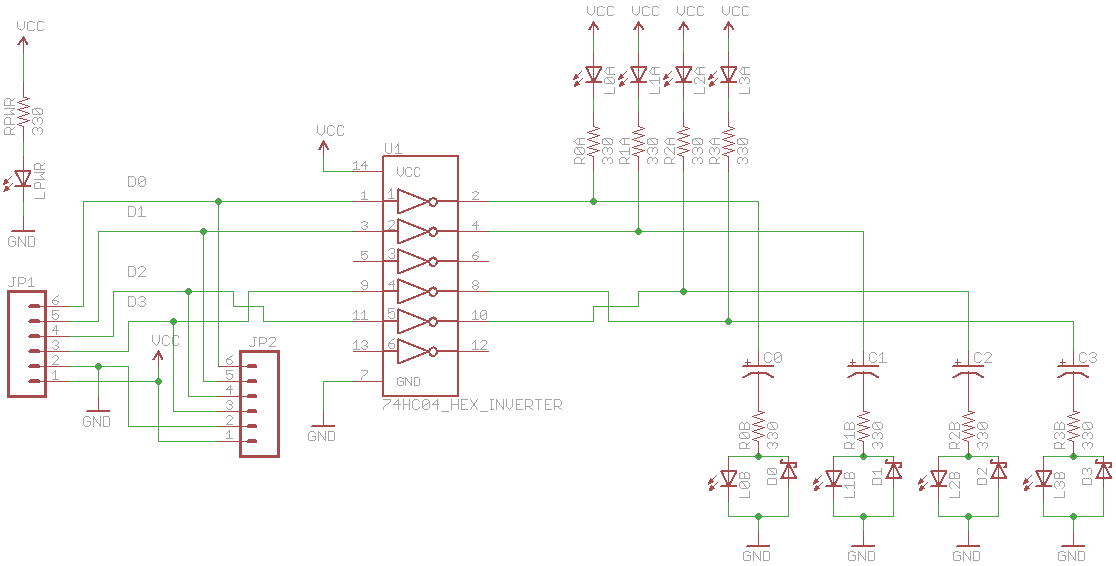
The next step was the daunting one: converting this into a board layout. The actual process was quite simple, though it involved a bunch of research to figure out: simply place all the components, and the route the “airwires”. Airwires are the board-level representation of unrouted signal connections, and having none of them represents having fully routed your board. I’m sure there’s far more sophistication to be learned here, but the high-level process ended up being remarkably simple, especially since in my case this board is simple enough to route that the autorouter was able to do it. It was actually pretty fun to mess with the component placement to try to make the routing more feasible; for instance, I originally had the ‘A’ resistors and ‘A’ LEDs swapped, with the resistors connected to Vcc, but I noticed that by swapping them, the wires wouldn’t have to criss-cross the board as much. It was a pretty cool exercise, and this is what I ended up with:
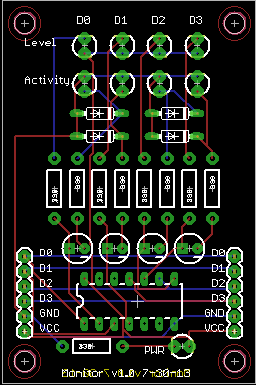
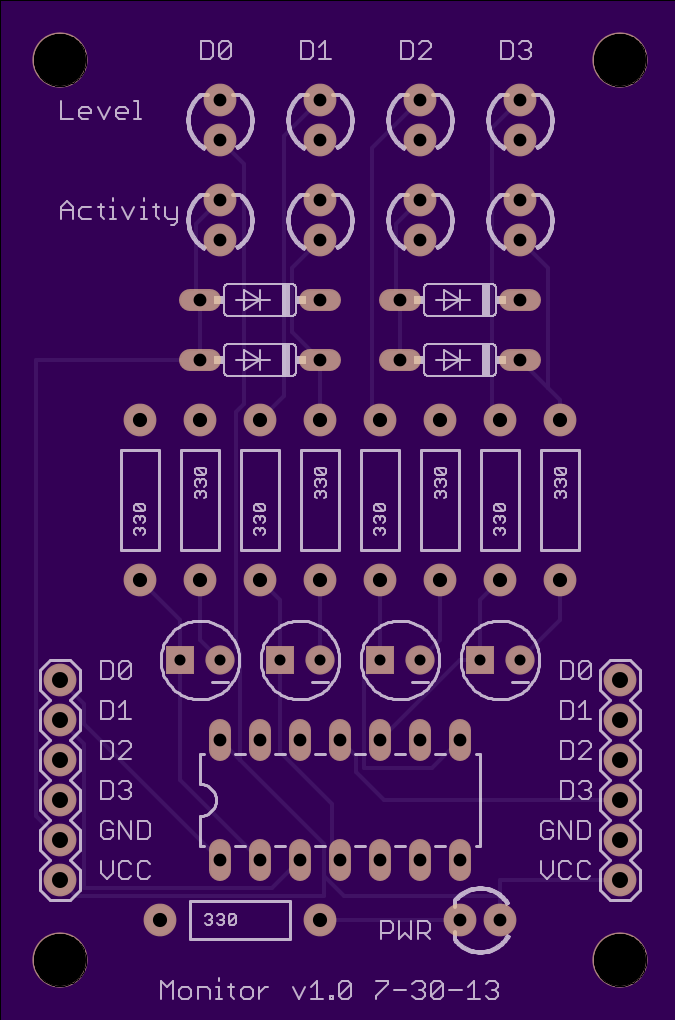
I submitted this to OSH Park, and they helpfully gave me back this representation of what they were going to make:
It all looked good, so I hit submit.
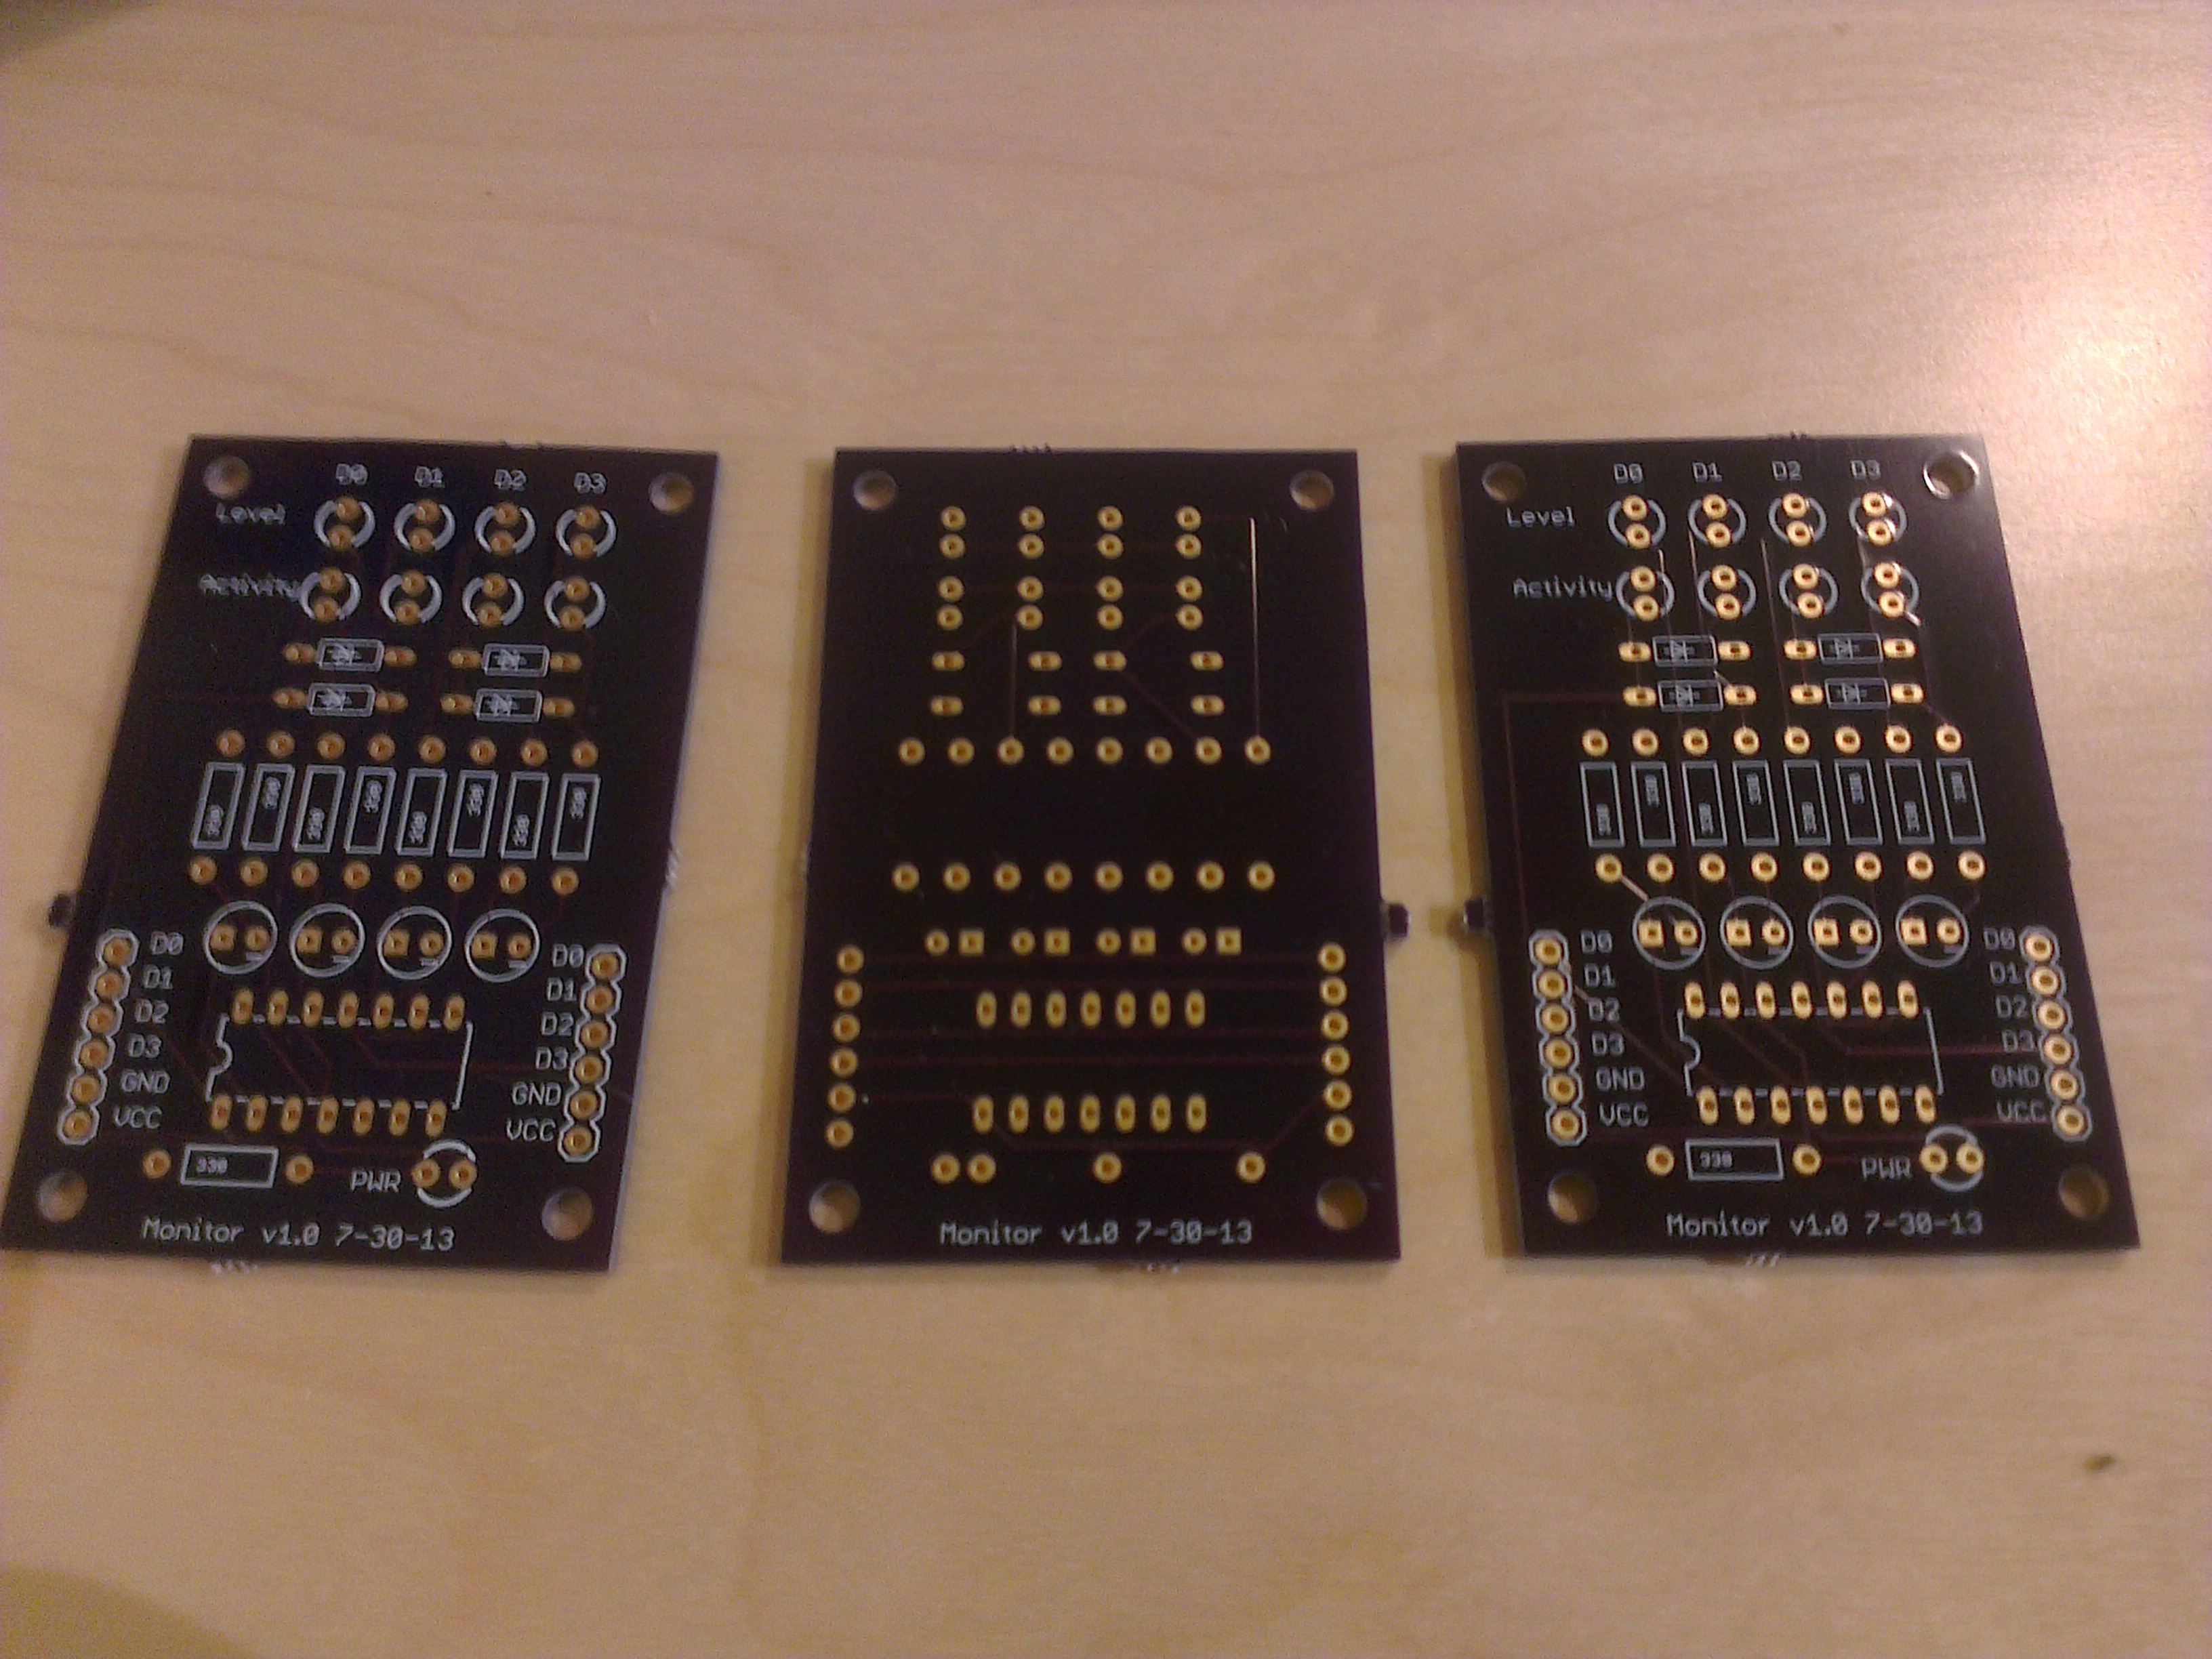
Receiving the PCB
This was about two weeks ago, and the PCBs just arrived in the mail today. They feel a bit smaller than I would have thought, but there’s something undeniably cool about holding something this precisely-crafted in your hand, and knowing that you designed it.
I probably should have done a simple multimeter connectedness test on the boards, but I was impatient so I immediately soldered one of them. There were a few things I learned in the process:
- My resistors and capacitors don’t exactly fit the slots, but are close enough
- My diodes have extra-thick leads and barely fit through the holes for them
- The order in which you solder things matters
- The silkscreen for the LEDs got cut off and I had to inspect the circuit to see which way they should go
- I designed the board for 3mm LEDs but tested on brighter 5mm LEDs, and furthermore forgot to actually order any 3mm LEDs
Here’s a picture of the partially-soldered PCB next to the breadboard I prototyped on:
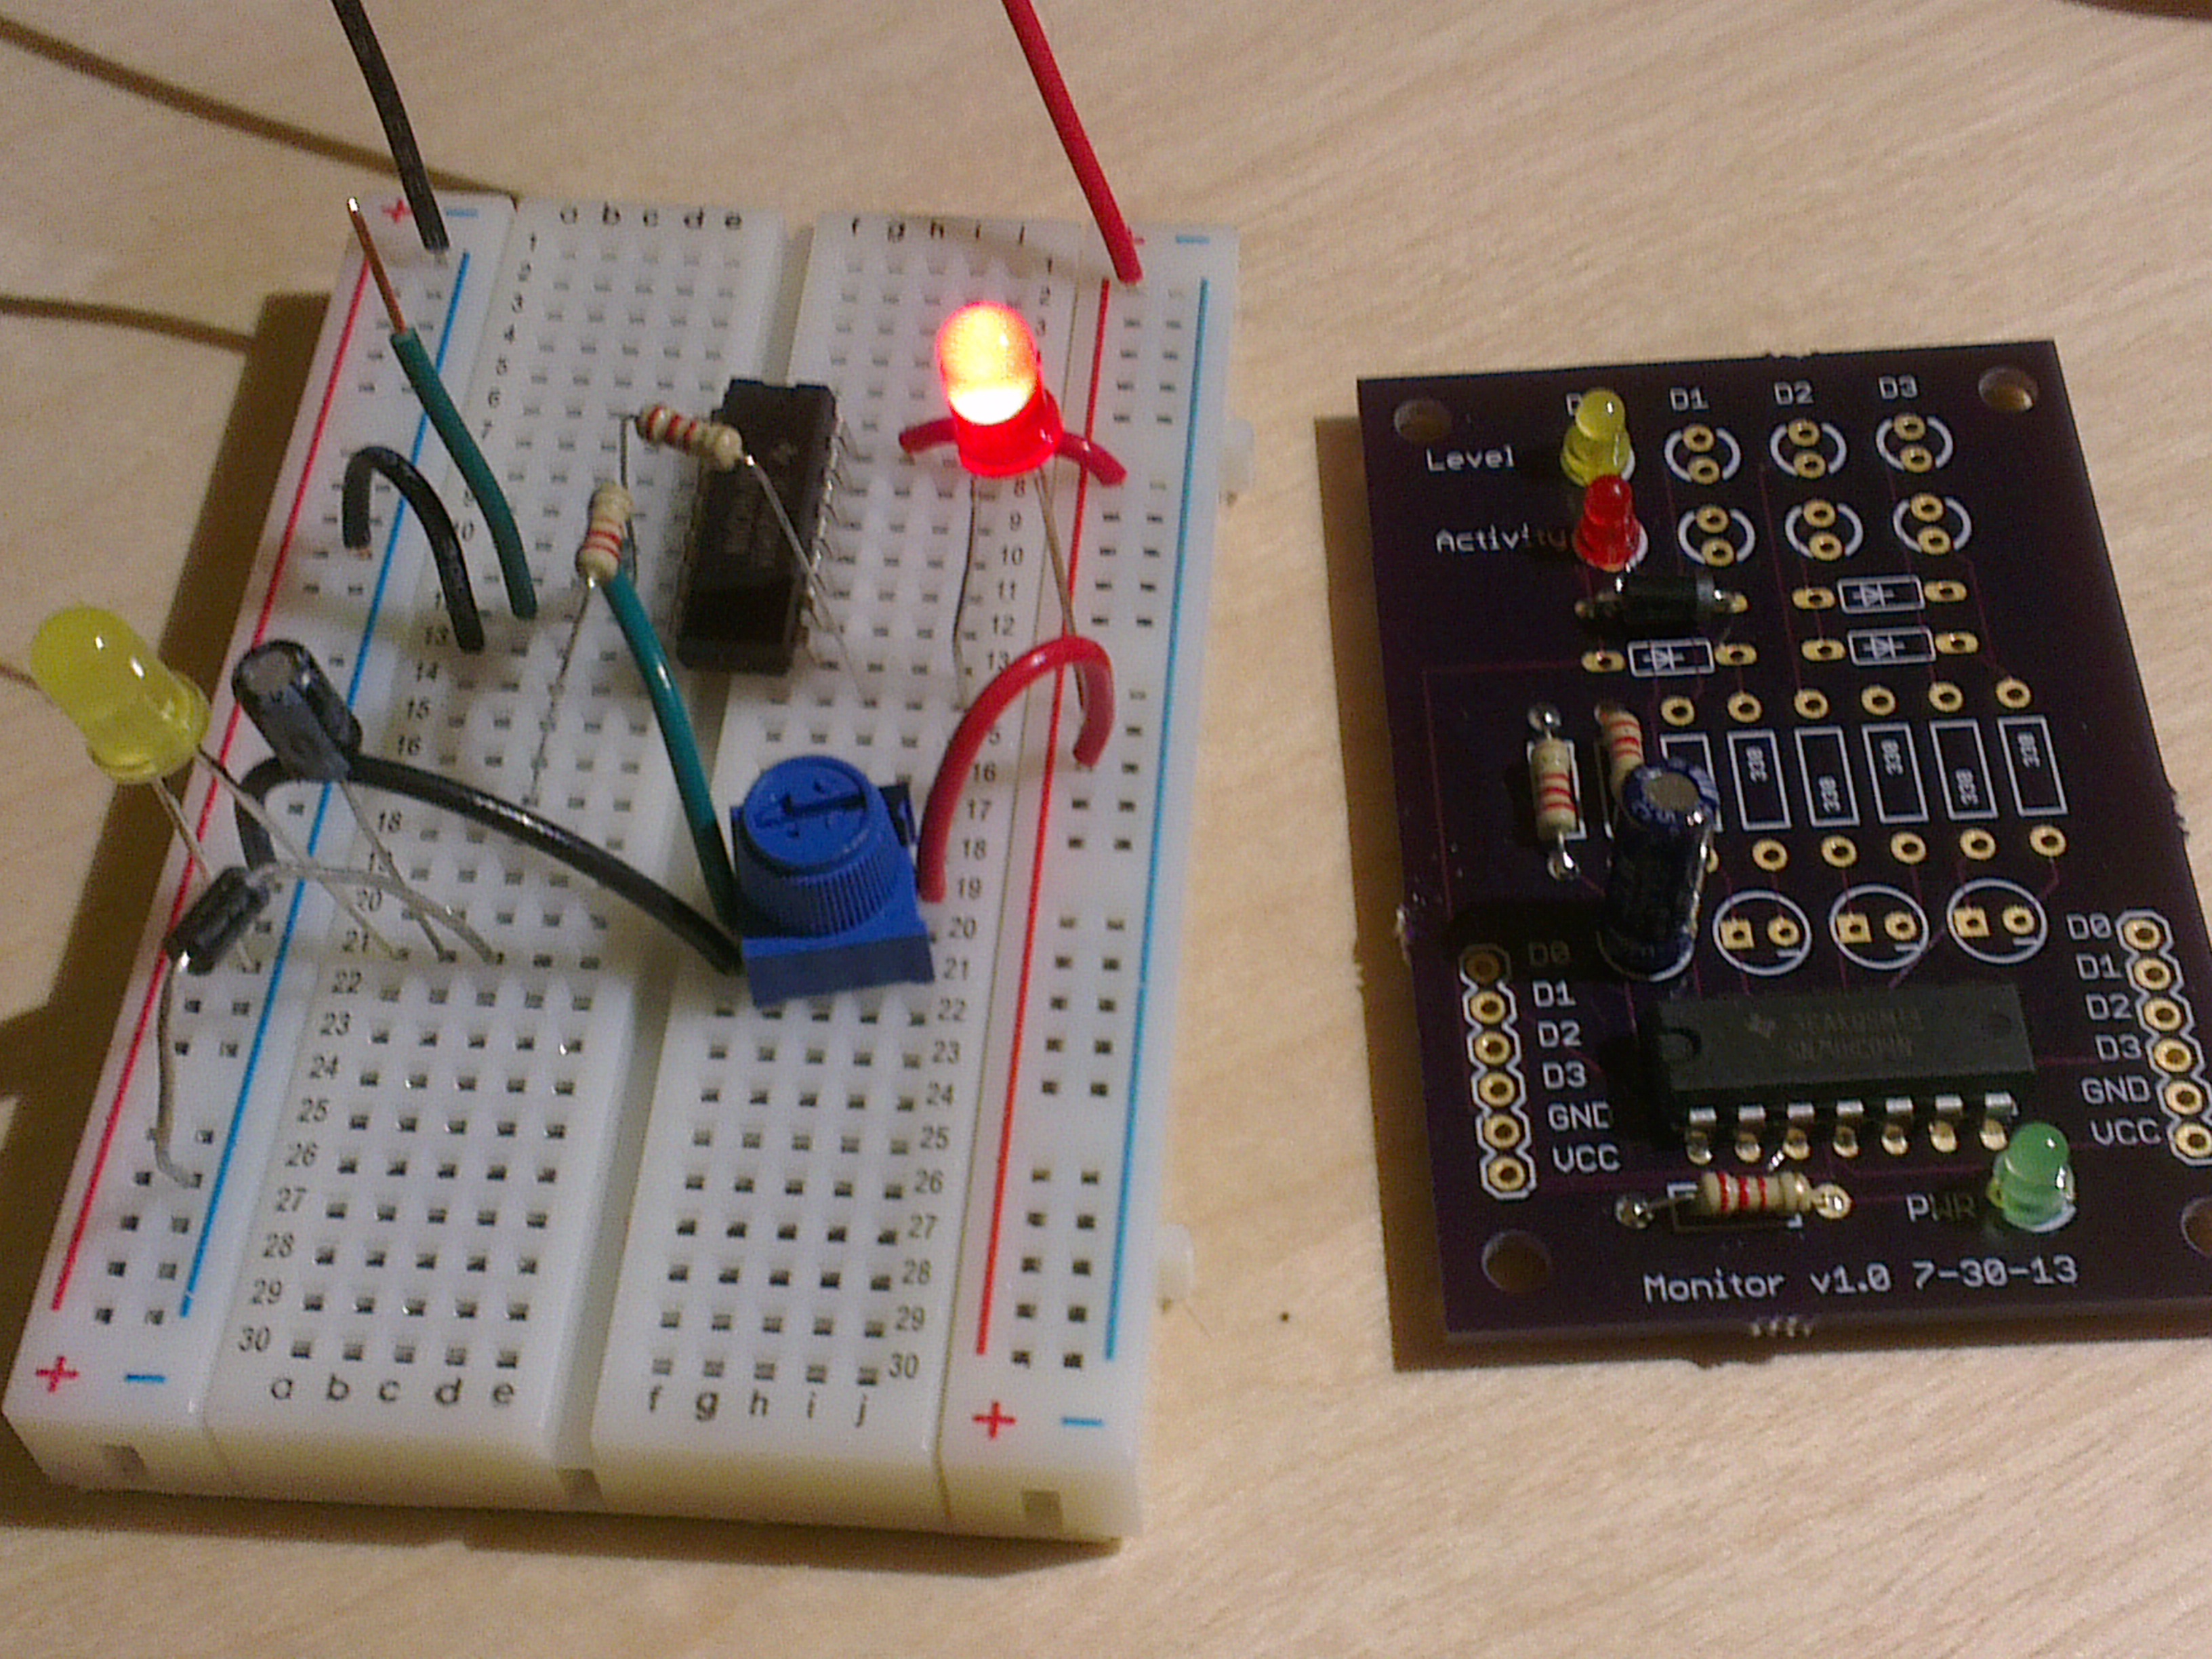
The PCB is definitely what I was hoping for in terms of compactness and robustness, but does it work? I plugged in the ground and power lines, and both the level and activity LEDs lit up. There were two problems: the first was that I didn’t expect them to light up, and the second was that they were both very dim. My theory is that the first problem, that the activity led was lit, is due to the fact that I left the inverter inputs floating, leading to an indeterminate output state which would oscillate between high and low. I’m tempted to add a large pull-down resistor to keep the values stable, though the point of the inverter was to handle the decoupling itself; I guess this is what the 1Mohm resistors in my kit might be for.
The dimness seems to be caused by my bad assumption that at a given current, the 5mm and 3mm LEDs I have would be equally bright. You can see what the 5mm LED looks like in the above photo (the red one on the left), which is running on about 1mA. and clearly visible Unfortunately, the 3mm LEDs in the same configuration are much dimmer; I’m not sure how much I can reduce the current-limiting resistors I’m using, since the inverter only advertises being able to source/sink 4mA per output.
The silver lining on not having any more 3mm LEDs is that I can pick the ones I buy to be brighter; perfecting the circuit wasn’t the focus of this particular part of the project, though, so I’ll get back to that later.
So yes, the PCB works, though with some minor component issues, and overall I’m very happy with the $26 I spent to get these made, and now feel like a whole new level of circuit complexity is opened up to me.

One response to “Making custom PCBs”
Me parece excelente tu post. Yo utilizo Gold Phoenix PCB, me funciona muy bien. Aqui en Venezuela no hay muchas opciones, y me sale mas barato comprar directamente en china en grandes cantidades.
Excelent post. I use GP. It works well to me. Here in my country Venezuela, no too much options to choose about PCB Houses, and its cheaper (and better quality) to buy in china.
LikeLike