As I’ve moved to smaller and smaller parts, I’ve spent more and more time inspecting small details of my boards. I’ve bought a couple things that I use for this purpose: a simple 10x loupe, a maybe 2-3x magnifying glass that I took from a helping-hands thingamajig that I don’t use, and this magnification visor. That last one I use pretty regularly when I’m soldering, and has a flap that lets you choose between 1.5x and 3x which is pretty nice. The other two I use when inspective my work afterwards, since they’re slightly nicer but require a free hand to use. I also use them to take pictures from my phone in order to increase the optical magnification.
The last thing that I’ve wanted, which I finally got, is a USB microscope. I caved when I saw this one for only $27 since that’s “what the heck” money, and to my surprise it’s relatively easy to use (even on Linux) and has decent quality. To get it working on Linux I had to install guvcview, which worked like a charm.
The microscope claims “20x-200x magnification”, but it looks like the magnification is fixed at 20x and then I presume their software will do 10x magnification if you want. The stand that comes only gives you enough space to barely keep the microscope above a circuit board with its components; I did some testing, and it looks like the maximum focal length is about a foot, so it’s capable of taking much wider pictures if you can somehow keep it steady. All the photos I took are at more-or-less maximum detail.
Here’s a sample pic, of some hot-fixing I did on the board I was playing around with:
There were orginally four capacitors in a row here, but I took these two out and shorted them, and used some component leads to help the solder bridge the gap.
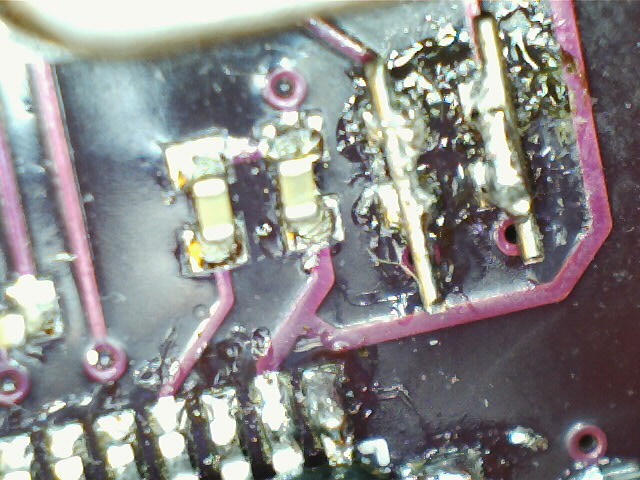
One thing that I check the most is the soldering quality on SMD parts. Here’s a pic showing some of that:

Unfortunately I’m not sure that this works so well for that purpose; I’m not sure what the biggest issue is, whether it’s the glare from the LED backlight, or maybe if it’s just a limit of using a mono-microscope instead of a bi-microscope (not sure what the actual terms are), which limits the perception of depth. Here’s a test with the backlight off, that I took to see if that reduced the glare:

I tried to not disturb the alignment, but it’s basically impossible to keep the microscope exactly steady as you make any adjustments to it, such as changing the backlight power, or changing focus.
And lastly, a picture of where there was a fire:

For this picture I moved my lamp closer to the board and used that instead of the LED light, which I think gave a much nicer picture, though there is a big shadow from the microscope itself.
I’m not sure how much I’ll be using this, but so far it’s been fun.

One response to “New toy: USB microscope”
These USB microscopes are great 🙂 You probably already figured this out, but you can get 200X by shifting the focus to the far extreme. Or at least you can if it’s anything like the one I have. The microscope has two focal points, so you found the second one when you held it at a foot away. The focal adjustment is a simple worm screw that moves it closer or farther from the board. You can also take video with it, which can be useful for watching changes.
Does yours have a switch for the LEDs? Mine doesn’t, so if the glare is bad, you’re kind of stuck. Hope you find uses for it, cause it is a cool toy 🙂
LikeLike